LibGDX Tutorial - A Running Game with libGDX - Part 5
• •
Check out part 1 for the project and world setup! Check out part 2 for implementing controls for our runner! We introduced our enemies on part 3. We rendered our background and ground on part 4.
Remember the code is on GitHub. Graphics were made by Kenney. Also, a final version based on this tutorial is on Google Play.
Where Are My Characters?
If are coming from the previous part, you probably know that we stopped showing our runner and the enemies but hey, at least the background and the ground are looking good! In this next part we are going to display our characters again.
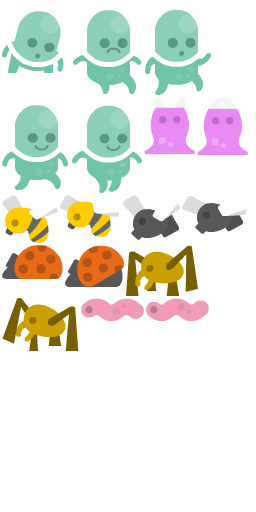
Let’s start with the runner (I know he’s not the same as the one on the final version, sorry!). So, we have four states for our guy: he’s either running, jumping, dodging or too busy getting hit by the enemies. We are going to store all his textures, along with the enemies’, in a texture atlas. Here is the image (characters.png):
And the following is the texture file (characters.txt):
characters.png
format: RGBA8888
filter: Linear,Linear
repeat: none
alienGreen_run1
  rotate: false
  xy: 2, 97
  size: 68, 93
  orig: 68, 93
  offset: 0, 0
  index: -1
fly_fly2
  rotate: false
  xy: 182, 195
  size: 65, 39
  orig: 65, 39
  offset: 0, 0
  index: -1
bee_fly2
  rotate: false
  xy: 60, 195
  size: 61, 42
  orig: 61, 42
  offset: 0, 0
  index: -1
alienGreen_jump
  rotate: false
  xy: 144, 2
  size: 67, 93
  orig: 67, 93
  offset: 0, 0
  index: -1
barnacle_bite1
  rotate: false
  xy: 144, 97
  size: 51, 57
  orig: 51, 57
  offset: 0, 0
  index: -1
alienGreen_dodge
  rotate: false
  xy: 2, 2
  size: 69, 71
  orig: 69, 71
  offset: 0, 0
  index: -1
alienGreen_hit
  rotate: false
  xy: 73, 2
  size: 69, 92
  orig: 69, 92
  offset: 0, 0
  index: -1
ladyBug_walk1
  rotate: false
  xy: 2, 245
  size: 61, 34
  orig: 61, 34
  offset: 0, 0
  index: -1
fly_fly1
  rotate: false
  xy: 123, 195
  size: 57, 45
  orig: 57, 45
  offset: 0, 0
  index: -1
bee_fly1
  rotate: false
  xy: 2, 195
  size: 56, 48
  orig: 56, 48
  offset: 0, 0
  index: -1
ladyBug_walk2
  rotate: false
  xy: 65, 245
  size: 59, 42
  orig: 59, 42
  offset: 0, 0
  index: -1
worm_walk2
  rotate: false
  xy: 146, 298
  size: 63, 23
  orig: 63, 23
  offset: 0, 0
  index: -1
spider_walk2
  rotate: false
  xy: 2, 298
  size: 77, 53
  orig: 77, 53
  offset: 0, 0
  index: -1
worm_walk1
  rotate: false
  xy: 81, 298
  size: 63, 23
  orig: 63, 23
  offset: 0, 0
  index: -1
alienGreen_run2
  rotate: false
  xy: 72, 97
  size: 70, 96
  orig: 70, 96
  offset: 0, 0
  index: -1
barnacle_bite2
  rotate: false
  xy: 197, 97
  size: 51, 58
  orig: 51, 58
  offset: 0, 0
  index: -1
spider_walk1
  rotate: false
  xy: 126, 245
  size: 72, 51
  orig: 72, 51
  offset: 0, 0
  index: -1
So if you are new to this you are probably asking yourself “What kind of sorcery is this?”. Well, I used TexturePacker to put together my .png files (they have an option for libGDX textures) and the two files were automatically generated. LibGDX also has its own TexturePacker but I’ve never tried it. My guess is that it would work even better for this game. Both of these files are stored in the assets directory.
The texture regions when the runner is hit, dodging or jumping are easy to get since they consist of a static frame (alienGreen_hit, alienGreen_dodge, and alienGreen_jump), we set a separate TextureRegion for each state and apply it inside our draw function. For the running state, we have two frames (alienGreen_run1 and alienGreen_run2) which we’ll use to create an Animation.
First, let’s take note of all this in our Constants class:
package com.gamestudio24.martianrun.utils;

import com.badlogic.gdx.math.Vector2;

public class Constants {

    ...

    public static final String CHARACTERS_ATLAS_PATH = "characters.txt";
    public static final String[] RUNNER_RUNNING_REGION_NAMES = new String[] {"alienGreen_run1", "alienGreen_run2"};
    public static final String RUNNER_DODGING_REGION_NAME = "alienGreen_dodge";
    public static final String RUNNER_HIT_REGION_NAME = "alienGreen_hit";
    public static final String RUNNER_JUMPING_REGION_NAME = "alienGreen_jump";

}
And in our Runner class, let’s assign these TextureRegion objects along with the running Animation.
package com.gamestudio24.martianrun.actors;

import com.badlogic.gdx.Gdx;
import com.badlogic.gdx.graphics.g2d.Animation;
import com.badlogic.gdx.graphics.g2d.Batch;
import com.badlogic.gdx.graphics.g2d.TextureAtlas;
import com.badlogic.gdx.graphics.g2d.TextureRegion;
import com.badlogic.gdx.physics.box2d.Body;
import com.gamestudio24.martianrun.box2d.RunnerUserData;
import com.gamestudio24.martianrun.utils.Constants;

public class Runner extends GameActor {

    private boolean dodging;
    private boolean jumping;
    private boolean hit;
    private Animation runningAnimation;
    private TextureRegion jumpingTexture;
    private TextureRegion dodgingTexture;
    private TextureRegion hitTexture;
    private float stateTime;

    public Runner(Body body) {
        super(body);
        TextureAtlas textureAtlas = new TextureAtlas(Constants.CHARACTERS_ATLAS_PATH);
        TextureRegion[] runningFrames = new TextureRegion[Constants.RUNNER_RUNNING_REGION_NAMES.length];
        for (int i = 0; i < Constants.RUNNER_RUNNING_REGION_NAMES.length; i++) {
            String path = Constants.RUNNER_RUNNING_REGION_NAMES[i];
            runningFrames[i] = textureAtlas.findRegion(path);
        }
        runningAnimation = new Animation(0.1f, runningFrames);
        stateTime = 0f;
        jumpingTexture = textureAtlas.findRegion(Constants.RUNNER_JUMPING_REGION_NAME);
        dodgingTexture = textureAtlas.findRegion(Constants.RUNNER_DODGING_REGION_NAME);
        hitTexture = textureAtlas.findRegion(Constants.RUNNER_HIT_REGION_NAME);
    }

    @Override
    public void draw(Batch batch, float parentAlpha) {
        super.draw(batch, parentAlpha);

        if (dodging) {
            batch.draw(dodgingTexture, screenRectangle.x, screenRectangle.y + screenRectangle.height / 4, screenRectangle.width,
                    screenRectangle.height * 3 / 4);
        } else if (hit) {
            // When he's hit we also want to apply rotation if the body has been rotated
            batch.draw(hitTexture, screenRectangle.x, screenRectangle.y, screenRectangle.width * 0.5f,
                    screenRectangle.height * 0.5f, screenRectangle.width, screenRectangle.height, 1f, 1f,
                    (float) Math.toDegrees(body.getAngle()));
        } else if (jumping) {
            batch.draw(jumpingTexture, screenRectangle.x, screenRectangle.y, screenRectangle.width,
                    screenRectangle.height);
        } else {
            // Running
            stateTime += Gdx.graphics.getDeltaTime();
            batch.draw(runningAnimation.getKeyFrame(stateTime, true), screenRectangle.x, screenRectangle.y,
                    screenRectangle.getWidth(), screenRectangle.getHeight());
        }
    }

    ...

}
That’s all there is for animating the Runner. Run the project and see the guy run and get hit by the enemies we still don’t see :D. The video below shows how the game looks so far:
Know Thy Enemy
I will take advantage of our EnemyType enum to store all the texture region names needed for each Enemy. They will be very easy to render now that we know how to render an Animation. Each enemy has its own sprites, I will set them as follows:
- Running small - lady bug
- Running wide - worm
- Running long - barnacle
- Running big - spider
- Flying small - bee
- Flying wide - fly
Let’s add these values in our Constants:
package com.gamestudio24.martianrun.utils;

import com.badlogic.gdx.math.Vector2;

public class Constants {

    ...

    public static final String[] RUNNING_SMALL_ENEMY_REGION_NAMES = new String[] {"ladyBug_walk1", "ladyBug_walk2"};
    public static final String[] RUNNING_LONG_ENEMY_REGION_NAMES = new String[] {"barnacle_bite1", "barnacle_bite2"};
    public static final String[] RUNNING_BIG_ENEMY_REGION_NAMES = new String[] {"spider_walk1", "spider_walk2"};
    public static final String[] RUNNING_WIDE_ENEMY_REGION_NAMES = new String[] {"worm_walk1", "worm_walk2"};
    public static final String[] FLYING_SMALL_ENEMY_REGION_NAMES = new String[] {"bee_fly1", "bee_fly2"};
    public static final String[] FLYING_WIDE_ENEMY_REGION_NAMES = new String[] {"fly_fly1", "fly_fly2"};

}
And as I mentioned before, use EnemyType to store these values:
package com.gamestudio24.martianrun.enums;

import com.gamestudio24.martianrun.utils.Constants;

public enum EnemyType {

    RUNNING_SMALL(1f, 1f, Constants.ENEMY_X, Constants.RUNNING_SHORT_ENEMY_Y, Constants.ENEMY_DENSITY,
            Constants.RUNNING_SMALL_ENEMY_REGION_NAMES),
    RUNNING_WIDE(2f, 1f, Constants.ENEMY_X, Constants.RUNNING_SHORT_ENEMY_Y, Constants.ENEMY_DENSITY,
            Constants.RUNNING_WIDE_ENEMY_REGION_NAMES),
    RUNNING_LONG(1f, 2f, Constants.ENEMY_X, Constants.RUNNING_LONG_ENEMY_Y, Constants.ENEMY_DENSITY,
            Constants.RUNNING_LONG_ENEMY_REGION_NAMES),
    RUNNING_BIG(2f, 2f, Constants.ENEMY_X, Constants.RUNNING_LONG_ENEMY_Y, Constants.ENEMY_DENSITY,
            Constants.RUNNING_BIG_ENEMY_REGION_NAMES),
    FLYING_SMALL(1f, 1f, Constants.ENEMY_X, Constants.FLYING_ENEMY_Y, Constants.ENEMY_DENSITY,
            Constants.FLYING_SMALL_ENEMY_REGION_NAMES),
    FLYING_WIDE(2f, 1f, Constants.ENEMY_X, Constants.FLYING_ENEMY_Y, Constants.ENEMY_DENSITY,
            Constants.FLYING_WIDE_ENEMY_REGION_NAMES);

    private ...
    private String[] regions;

    EnemyType(float width, float height, float x, float y, float density, String[] regions) {
        this.width = width;
        this.height = height;
        this.x = x;
        this.y = y;
        this.density = density;
        this.regions = regions;
    }

    ...

    public String[] getRegions() {
        return regions;
    }
}
Our EnemyUserData should now store the region names the Enemy should render. We’ll pass the texture regions set in the constructor:
package com.gamestudio24.martianrun.box2d;

import ...

public class EnemyUserData extends UserData {

    private Vector2 linearVelocity;
    private String[] textureRegions;

    public EnemyUserData(float width, float height, String[] textureRegions) {
        super(width, height);
        userDataType = UserDataType.ENEMY;
        linearVelocity = Constants.ENEMY_LINEAR_VELOCITY;
        this.textureRegions = textureRegions;
    }

    public void setLinearVelocity(Vector2 linearVelocity) {
        this.linearVelocity = linearVelocity;
    }

    public Vector2 getLinearVelocity() {
        return linearVelocity;
    }

    public String[] getTextureRegions() {
        return textureRegions;
    }
}
And modify our EnemyUserData instantiation inside WorldUtils:
package com.gamestudio24.martianrun.utils;

import ...

public class WorldUtils {

    ...

    public static Body createEnemy(World world) {
        ...
        EnemyUserData userData = new EnemyUserData(enemyType.getWidth(), enemyType.getHeight(), enemyType.getRegions());
        body.setUserData(userData);
        shape.dispose();
        return body;
    }

}
Now we have all the assets we need to render the enemies! The logic to render them will be fairly similar to the logic we used to render our Runner with one exception. I’m rendering a bigger rectangle than the actual physics body (20% wider, 10% higher). The purpose of this is to make a little bit of overlapping possible between the runner and enemies so the hits look more real. The changes are the following:
package com.gamestudio24.martianrun.actors;

import com.badlogic.gdx.Gdx;
import com.badlogic.gdx.graphics.g2d.Animation;
import com.badlogic.gdx.graphics.g2d.Batch;
import com.badlogic.gdx.graphics.g2d.TextureAtlas;
import com.badlogic.gdx.graphics.g2d.TextureRegion;
import com.badlogic.gdx.physics.box2d.Body;
import com.gamestudio24.martianrun.box2d.EnemyUserData;
import com.gamestudio24.martianrun.utils.Constants;

public class Enemy extends GameActor {

    private Animation animation;
    private float stateTime;

    public Enemy(Body body) {
        super(body);
        TextureAtlas textureAtlas = new TextureAtlas(Constants.CHARACTERS_ATLAS_PATH);
        TextureRegion[] runningFrames = new TextureRegion[getUserData().getTextureRegions().length];
        for (int i = 0; i < getUserData().getTextureRegions().length; i++) {
            String path = getUserData().getTextureRegions()[i];
            runningFrames[i] = textureAtlas.findRegion(path);
        }
        animation = new Animation(0.1f, runningFrames);
        stateTime = 0f;
    }

    ...

    @Override
    public void draw(Batch batch, float parentAlpha) {
        super.draw(batch, parentAlpha);
        stateTime += Gdx.graphics.getDeltaTime();
        batch.draw(animation.getKeyFrame(stateTime, true), (screenRectangle.x - (screenRectangle.width * 0.1f)),
                screenRectangle.y, screenRectangle.width * 1.2f, screenRectangle.height * 1.1f);
    }
}
Run the game and now you will see your fierce enemies coming towards you! Jump and dodge to avoid getting hit by any of them! The game should be working like in the video below (ignore the title, the original game name was modified before the first release):
Finally, I’d like to go back to our Runner drawing and apply the same ratio we just applied to our enemies (only 20% wider, though) so the overlapping also applies nicely to our Runner:
package com.gamestudio24.martianrun.actors;

import ...

public class Runner extends GameActor {

    ...

    @Override
    public void draw(Batch batch, float parentAlpha) {
        super.draw(batch, parentAlpha);

        float x = screenRectangle.x - (screenRectangle.width * 0.1f);
        float y = screenRectangle.y;
        float width = screenRectangle.width * 1.2f;

        if (dodging) {
            batch.draw(dodgingTexture, x, y + screenRectangle.height / 4, width, screenRectangle.height * 3 / 4);
        } else if (hit) {
            // When he's hit we also want to apply rotation if the body has been rotated
            batch.draw(hitTexture, x, y, width * 0.5f, screenRectangle.height * 0.5f, width, screenRectangle.height, 1f,
                    1f, (float) Math.toDegrees(body.getAngle()));
        } else if (jumping) {
            batch.draw(jumpingTexture, x, y, width, screenRectangle.height);
        } else {
            // Running
            stateTime += Gdx.graphics.getDeltaTime();
            batch.draw(runningAnimation.getKeyFrame(stateTime, true), x, y, width, screenRectangle.height);
        }
    }

    ...

}
Run the game one last time to make sure everything is working as expected (ignore the title, the original game name was modified before the first release):
That’s a Wrap!
Congrats on making it this far! I hope that this guide helped you understand a little better the basics of libGDX, using box2d and scene2d, and adding textures to your game. There are probably many things I could’ve done better, but I’m satisfied with the final product for teaching purposes.
I added more stuff to the game such as UI controls for menus, playing music and sounds, integrated Google Play Game Services as well as tweaked it a little bit to gradually increase the speed of the game. That’s fairly easy to implement and I think you can do it following libGDX’s wiki and other tutorials. Look at the final code to see how I did it.
Thanks for reading. If you liked this tutorial, I would really appreciate it if you could help spread the word by sharing it.
Cheers!